If you’re looking to change the sealing wire on your hooded style shrink wrapping machine, you’ve come to the right place. In this YouTube video, we’ll guide you step-by-step on how to successfully replace the sealing wire. Whether you’re a seasoned professional or a beginner in the packaging industry, this tutorial is designed to help you get the job done efficiently.
Before we dive into the process, let’s talk a bit about the importance of having a reliable sealing wire and the benefits of using a used shrinking machine. A sealing wire is a crucial component of any shrink wrapping machine as it provides the necessary heat to seal and secure your products. Over time, the wire may wear out or break, requiring a replacement.
Now, let’s get started with the step-by-step guide on changing the sealing wire on your shrink wrapping machine:
Step 1: Safety First
Before beginning any maintenance or repair work, it’s essential to ensure your safety. Make sure the machine is turned off and unplugged to avoid any accidents.
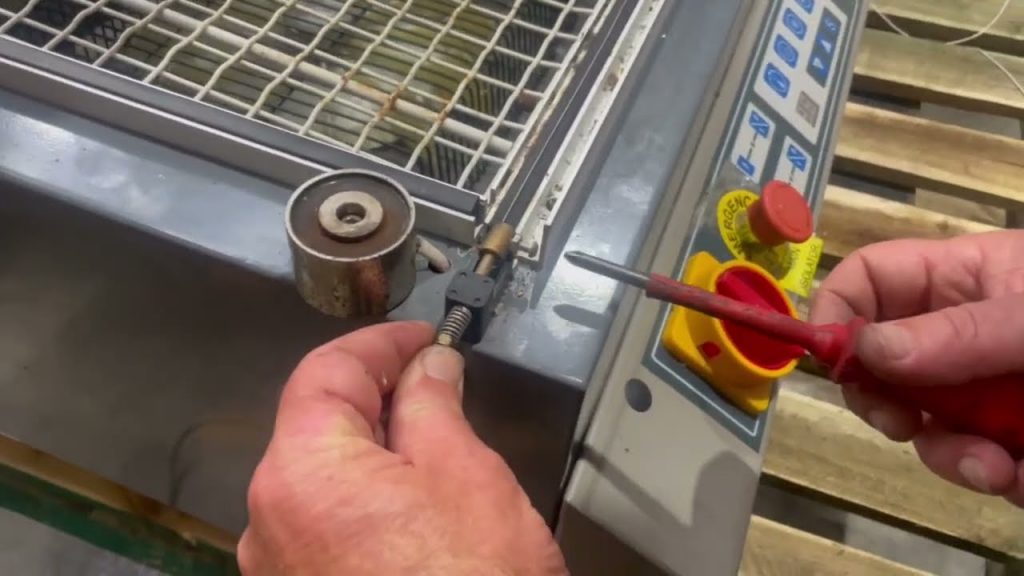
Step 2: Locate and Remove the Old Sealing Wire
Inspect your machine to find the location of the sealing wire. It is usually positioned near the sealing bar. Carefully remove the old wire by loosening any screws or clamps that are holding it in place.
Step 3: Install the New Sealing Wire
Take your new sealing wire and position it in the same location where the old one was removed. Ensure that it is straight and aligned properly. Tighten any screws or clamps to secure the wire in place.
Step 4: Test the Sealing Wire
Once the new wire is installed, it’s crucial to test its functionality. Plug in the machine and turn it on. Allow the sealing wire to heat up for a few minutes and check if it is sealing the shrink wrap material efficiently.
Step 5: Fine-tune the Sealing Wire
If necessary, adjust the tension or alignment of the sealing wire to achieve the desired seal quality. This step may require some trial and error, but it is crucial to ensure optimal results.
That’s it! By following these steps, you can easily change the sealing wire on your hooded style shrink wrapping machine. Remember to prioritize safety and perform regular maintenance to prolong the life of your machine.
Using a used shrinking machine can be a cost-effective solution for businesses looking to save on equipment expenses. These machines have been refurbished and tested, ensuring their reliability and performance. When purchasing a used shrinking machine, it’s essential to choose a reputable supplier that offers quality products and excellent customer support.
In conclusion, changing the sealing wire on your shrink wrapping machine is a simple task that can be accomplished with the right guidance. By following the steps outlined in this video, you’ll be able to replace the wire and continue using your machine efficiently. Don’t forget to consider the benefits of purchasing a used shrinking machine for your packaging needs.
Check out our website for a wide range of coil packing solutions and get in touch with our leading manufacturer for professional and reliable packaging solutions today. Shrinking Machine
“Mastering Sealing Wire Replacement: A Comprehensive Guide to Changing Sealing Wire on Shrink Wrapping Machines and Used Shrinkers”
Related posts:
 “Innovative Heat Shrink Machine for Enhanced Steam Shrinkage Efficiency”
 “Efficiently Streamline Packaging with the Advanced Automatic Shrinking Machine”
 “Efficient Heat Shrink Wrapping Solution: Compact and Affordable Tunnel Machine for Small-scale Packaging”
 “Efficient Wrapping Solution for Industrial Products: Boost Packaging with Cutting-Edge Shrink Wrapping Technology”
 “Mastering Bottle Shrink Wrapping: Ultimate Guide to Efficiently Shrink Wrap with a Shrink Wrap Machine”
 “Inventor’s Marvel: Self-Shrinking Success Achieved with His Own Creation!”
 “Effortlessly Operate a Shrink Wrapping Machine with the 4-GPEKH-455 Model: Get Yours Today!”
 “Efficient Shrink Wrapping Solution: Innovative L Sealer with High-Performance Shrink Tunnel”
 “Innovative Easy Film Automatic Shrink Wrapping Machine for Efficient Packaging”
 “Efficient Bottle Shrink Wrap Machine: Affordable High-Speed Solution for India’s Packaging Needs!”